SBS 2011 Essentials & Microsoft Office 365 Integration
November 30, 2011 17 Comments
 As you may be aware Microsoft have released the Office 365 Integration Module for SBS Essentials to public beta.
If you want to take part in the beta, you can download the software from here.
On December 22nd Microsoft released the module for public download. A finished product. At last. Read the Official SBS Blog post here and Download from here and see what you think!
You can get an overview of what the module will do for you from the above blog post, and i imagine you already have an idea of what the module is designed to do already.
As i have been chronicling the other major (ish) releases for SBS Essentials, i decided to install the module and see exactly what the almost finished article looks like.
Before you continue i think it only fair to warn you this is a long, long post.
I have split the post into the following sections.
- Installation & Sign Up
- Password Policy
- Dashboard Integration
- Add Domain Wizard & Domain Verification
- Managing User Accounts & Password Sync
- Remote Web Access Integration
- Log Files & Services
- Launchpad
- Email Settings
- Email Display Name
- Office Applications
- I have not gone too deeply into the way Office 365 works, or the different plans that are available, as i am really only interested in the integration with SBS Essentials, you can do your own research on Office 365!
Installation & Sign Up
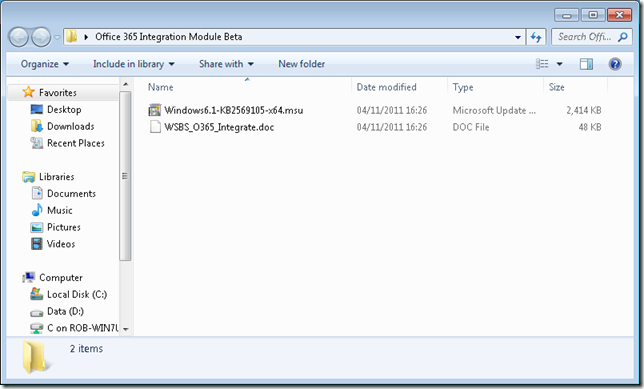
Having downloaded the software you will have an MSU file that you can install, Windows6.1-KB2569105-x64.msu
When you launch the installer you will have a series of pages to work through.
The first page gives you the chance to select if you are already signed up to Office 365.
I didn’t have an account, so i didn’t check this box.
On the next page you have a choice to make, whether you want to sign up for the Office 365 P plan, or the E plan. The plans are different and have different pricing. I am not really an expert on Office 365 so i don’t know much about the plans, except to say firstly there is no real upgrade path between them, second that the P Plan only supports a maximum of 50 people, at 51, you have to change to the E plan, this means cancelling your services and signing up again for the E plan. That shouldn’t be a show stopper for any SBS Essentials network as Essentials is limited, as you all know by now, to 25 users.
You can find more info about the different plans here at this post from Microsoft Denmark. Or just Bing for it! (yes ok use Google)
I am not signed up as i said, and i don’t plan to sign up either so I chose to ‘try’ the Office 365 for professionals and small businesses. When you click one of these links you will be sent off to the Office 365 website.
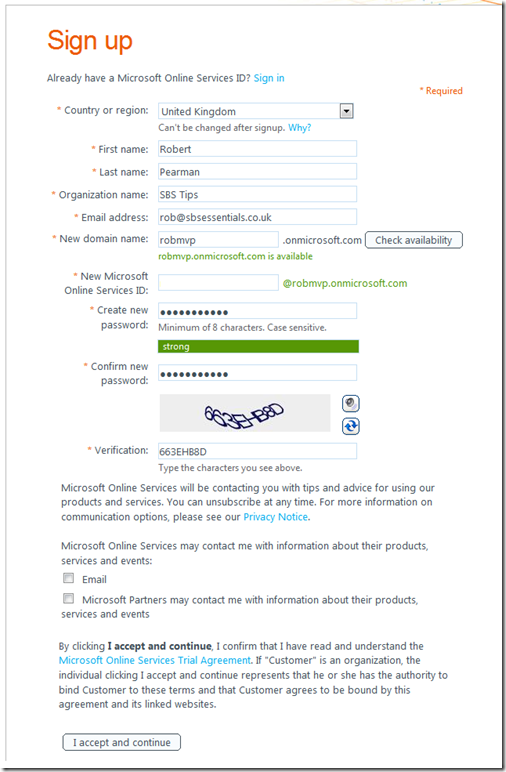
The sign up page..
You will have to sign up for a ‘new domain name’ which will be a subdomain of onmicrosoft.com, all accounts at Office 365 will have an onmicrosoft.com domain as well as the ability to use your own domain name that you may already own.
Once you have checked the availability you can either continue or you may have to choose again if your domain name choice is already chosen.
You can then accept the terms and conditions and continue on to your Office 365 Dashboard.
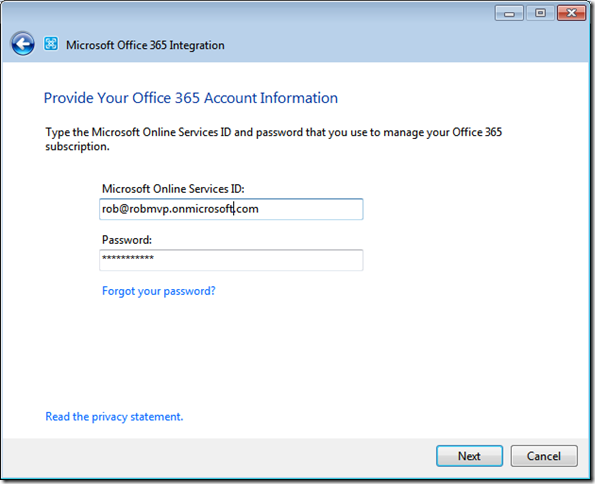
Switching back to your Essentials server, the wizard has moved on to prompt for your Office 365 Credentials.
Enter your credentials and click next.
Password Policy
You will be prompted to apply a strong password policy to the network. This is because the Office 365 password policy is set to strong, but the default definition of Strong for SBS Essentials, doesn’t match the Office 365 definition of Strong.
We can compare the above to the default for SBS Essentials.
The above is from the Group Policy Management Console, which up until about 5 minutes ago is where i would usually go on an SBS Essentials to look at the password policy. Of course i had neglected to look in the Dashboard.
The default dashboard settings for the password policy are shown below.
We can see that the complexity requirements are mirroring that of the GPMC, without showing all of the available settings.
What is interesting is when we apply the Office 365 Module, the dashboard control changes, however the GPMC settings do not appear to change.
We can see the description now includes some more directions about the password policy and that we now have a minimum of 8 characters and a maximum of 16. What happens if your accounts password doesn’t currently meet that requirement? We’ll get to that.
Moving back to the GPMC we can see that no changes have been made to the Default Domain Policy, Password Policy.
Back to the installation of the Office integration..
Accepting the Password Policy page changes, you will see that the Module is configured..
Then you should be told the dashboard has to re-started to finish installing.
Dashboard Integration
Once the Dashboard restarts you will see a new tab for Office 365.
If you load the tab, you will see all the new integration options available to you.
You will see you have some information about your Organization (if you had forgotten who you were), Which Plan you are signed up to, how many licenses you have, and which domains you have linked.
On the right hand side you have some shortcuts to the Office 365 dashboard, the support forum, a link to submit a support ticket and change your password. There is also a link to uninstall the Integration Module, and one to launch the Add Domain Wizard.
Moving on we can link an existing domain to our Office 365 account.
I have to say before i continue, that the story has skewed off into a tangle of lies and deceit so thrilling that one day, yes, a film may indeed be made about my journey of transferring my domain name to Office 365. It’s actually good that is was not smooth because i think all to often we blog about the way things are supposed to work, and for the most part we are running systems in labs of nicely spec’d, under loaded servers and we don’t often see problems. Lucky for me this was a real domain, and i am actually transferring it, so this is a real test of the transfer process and the support i received from Office 365. I’m just warning you ahead of time, you may not be interested so feel free to skip ahead.
Add Domain Wizard & Domain Verification
From the Dashboard you can see a link on the right hand side, called ‘Link a Domain to Office 365’ you can click this to start the process.
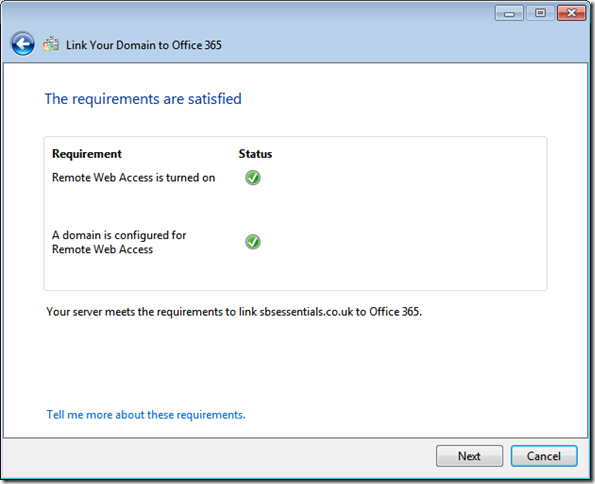
You can see above that you must have already configured remote web access to your server before you can start this process. Clicking next you can move on.
We can see from the above a small check has been carried out that will confirm we have indeed got remote web access working, it has also detected the domain name we have used for remote web access.
You just have to wait while the next page runs through some tasks…
That’s that. Your domain is now Linked with your Office 365 account.
Your now returned back to the Dashboard and you can see the status of the domain is ‘Verifying’
I decided to login to the Office 365 website, which, on reflection may have been a bad idea.
So far that remains to be seen, but as i am writing this i am wondering if by doing what follows, i may have ‘got involved’ with an otherwise automated process, and accidentally broken it myself, just like i did with the GoDaddy SSL wizard… when will i learn?
IF YOU WANT TO SKIP AHEAD, Click Here
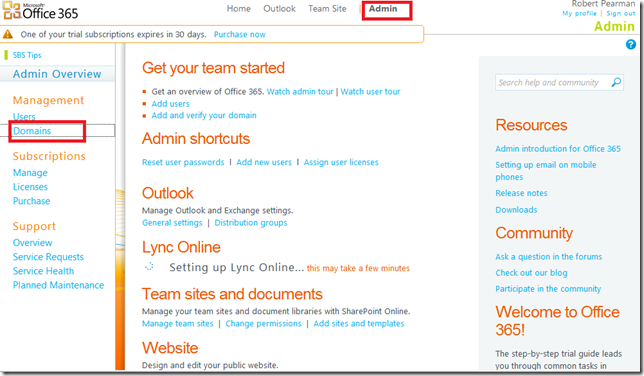
Logging into Office 365 you can move to the Admin tab, then select Domains.
Under Domains you can see the status of your domain is ‘Pending Verification’
Clicking into the domain you are presented with the steps required to verify your ownership of the domain with Office 365. The first being adding a TXT record.
At this point i need to switch to my DNS Control panel at ENOM.
And then switching to a command prompt i can verify this record was added successfully.
Back to the Office 365 window, and i can ask them to Verify my domain.
On the next page i was told i needed to change my name servers. I have to say at this point i was a little upset. I really had a strong objection to having to change my name servers to sign up my domain to office 365, not because i have any particular problem with letting Microsoft host my DNS, but because i didn’t want any downtime. I wanted to have a seamless switch between my current system and my Office 365 experience. Clearly, that was not going to happen.
So i continued.
72 hours??? 72 hours???? Its Friday night, i have 48 hours really, before i need this working again to run my business. 72 hours? puts me at Monday night. That means potentially all of Monday with no website and no email.
But, being the optimistic guy you have come to know and dare i say, love? I decided to crash on anyway. I use the word crash here so you imagine a guy who just piles through any obstacle blissfully unaware of the devastation he leaves in his wake.
Again moving back to ENOM..
Confirmation that i will need to be able to edit my DNS records through Office 365 in order to manage my Domain.
A quick check a few minutes later and i can see my Name Servers are moving.. At this point my domain is ‘down’.
Back to Office 365.
Clicking Next completes the verification tasks.
I went back to the Domains area, and the status of my domain now shows as Active – great. Even though the name servers had not transferred, i was expecting to be able to now manage the DNS for my domain and make a start setting up records so that when the switch finished my Zone File was already up to date, this is how i have managed Name Server switches at many providers over the years and i am sure people reading will have done something similar. Unfortunately this was not the case.
Clicking inside my domain, sbsessentials.co.uk, there is no DNS Manager tab. I do have an explanation that my domain is currently ‘partially redelegated’ and that i have to make changes at my registrar in order to have my Domain work with Office 365.
Switching to the DNS Settings tab, helpfully i can see what records i should create, if i was in fact able to create them.
I left the process at this point to take it’s course and continued to check it over the weekend periodically.
I think some time on Saturday i got to the point where i could see the name servers had updated, but that was all that had happened.
Of course my worst fears had been realised, and by Sunday night there was no progress from this point.
(In fact now writing this on Wednesday, there is no progress)
I knew that Microsoft had put in the caveat that it might take 72 Hours for this to complete. That meant i could not attempt to contact them until at least the 72 hours was up without wishing to get a ‘it can take 72 hours’ type of response.
However what i did do was have a look at the troubleshooting steps offered.
Above are the 3 possible scenarios you are in.
Of course i discounted option 1, firstly because the obvious answer to that question is – well change the name servers.
I also knew the answer to option 2 would be – it can take 72 hours to change your name servers.
Which it was.
Thirdly i tried the last option, in the hope it would offer me some sort of solution.
It attempted to verify my domain again, Good! i thought maybe it will see the name servers have updated and ill be in business.
No.
DNS Records at my Registrar are not correct? No Sh… i paused for a moment and Zen like, closed my browser.
I waited till the 72 hours was up and logged a ticket. I wont bore you with the details but i will say, it is a slow process, and i have yet to speak to someone who actually grasps the issue. I don’t think that is the fault of the techs who are helping me, just that they are going through their escalation procedure and i need to be at a higher level. I will say the techs who have helped me have been professional and charming. Much like myself.
I should probably point out at this point this is my personal domain name that does not run anything critical, i bought it when i was testing the SSL wizard, and use it for my lab server, so the fact it is down is not critical to me and doesn’t affect me at all. The problem is this, this could have been a client of mine and now, 5 days later i am without email. With a client i would have reversed the name server change on Sunday and had their records setup at ENOM, either pointing to Office 365 or more likely rolled back to their existing settings. I am sticking with this because i want to see the process through.
Also whilst writing this the though occurred to me that perhaps SBS Essentials would have taken care of both the verification, and the name server transfer for me. After all, SBS Essentials had access to my Enom account, and my Office 365 account, it is not beyond the realms of possibility that it is indeed how the process should occur. Nothing i read, or have been told since this occurred confirms that however, so i am going to carry on and hopefully get this resolved soon.
In the mean time, check out the amazing integration between the RWA and Office 365.
Looks great i think, and I’ll come back to the RWA later.
Update 19/11/2011
I did eventually get through to a very competent tech based in the UK (who i randomly met up with at a SMB MVP Road Show event) who has worked tirelessly to find the resolution to the problems i had, and even joined in with filing bugs for the SBS Essentials/Office 365 build. It was confirmed that the process should not be interrupted as i did by manually changing name servers, and that you should just leave the server to do it’s thing.
YOU CAN STOP SKIPPING NOW
Add Domain Wizard & Domain Verification (Continued)
When your own domain name shows as verifying, dont be tempted to login to Office 365 and follow any of the prompts.
If you read the above fully, you’ll know that by doing that i lost access to my domain for a period of time.
The line i can give you right now, is don’t change your name servers to Office 365. The integration between SBS Essentials and Office 365, combined with having your domain hosted at Enom or GoDaddy allows the SBS to actually perform the verification and updating of DNS records automatically for you. Including the MX records, Autodiscover, and the records for Lync SIP Services.
The integration is still in Beta, and i think one or two things may still be being worked out, like what happens if your domain is not with Enom or GoDaddy, and you have to do the verification manually. According to one tech i spoke to the P Plan doesn’t actually ‘like’ having a domain added automatically (or via the PowerShell interface which is how Office 365 integration is handled) and you may end up having to manually remove the domain then manually add it again.
I am sure these things will be sorted out for the release… ok fairly sure…
Let’s assume for the moment that the domain is actually working, we can move onto look at the rest of the integration.
Managing User Accounts & Password Sync
If we switch back to the users tab, we can see on the right hand side two options relating to assigning Office 365 accounts. Each of these options does something slightly different, but at the same time, the same thing.
The first, the one towards the top, will assign a single account to the currently selected user. The lower, predictably will allow you to run through all of the user accounts you choose, and select to have Office 365 accounts.
Starting with the single account option..
Select the user you want to assign an Office 365 account, and click Assign Office 365 account.
The first step is to select their email address, which is also their username.
The wizard will do the rest and complete. Next you are told you must reset your password in order to gain access to Office 365.
This is so that the password sync between SBS Essentials and Office 365 can complete.
Closing that screen you can see that in the last column we now have an Office 365 account shown.
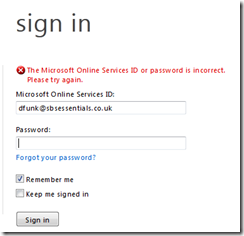
At this point i tried to login to Office 365 without first resetting my password, and it didn’t work.
After resetting my password, i was able to login instantly, there was no delay at all.
Moving on to the bulk add users option, you can see again the first step is to choose usernames, and then again the wizard will complete the rest for you.
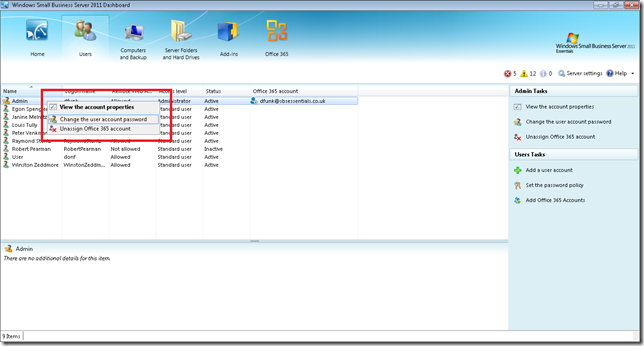
This took a while longer as i had several accounts to add, and then as before you will find you must reset your password before you can login to Office 365, but this time around the users will be prompted to change their password next time they login to their computer, Of course you can just change their passwords for them through the Dashboard if you wish.
Remote Web Access Integration
The RWA also gets a little magic..
As i showed briefly earlier, a new gadget shows up in the RWA after installation which provides links to OWA, Sharepoint and the Office 365 portal.
Predictably enough these are litterally just links to the various web pages.
Starting with the email Link.. would you like to guess what this will launch? Don’t forget to sign in..
The first time you Login to OWA you will need to set your regional options –be careful as the default is not London time..
Moving on to the Sharepoint link, this will launch your public facing Sharepoint site – you may not know you have one, but you do!
Note the URL will be your *.onmicrosoft.com domain name.
If you want to get to your private Sharepoint site, you can use the Member Login button.
Finally the last link named Home, will take you to your Office 365 portal.
Log Files & Services
As we have just changed some passwords, you might be wondering how the password sync occurs between Essentials and Office 365?
Well you may have noticed when we installed the Integration we gained some services.
They are:
Microsoft Online Services Sign-in Assistant
Windows Server Office 365 Integration Service
There are also 2 new log files to feast your eyes on.
SharedServiceHost-O365ProviderServiceConfig.log
SharedServiceHost-O365ProviderServiceConfig.[GUID].log
My SharedServiceHost-O365ProviderServiceConfig.[GUID].log actually continued on into a second log file.
The log files will of course be useful if you need to do any troubleshooting of your Integration install, or if any of the tasks do not function as you expect.
As an example you can see the Password Change occur in the log file SharedServiceHost-O365ProviderServiceConfig.log
Launchpad
The Launchpad also gets a new link, along the same lines as the integration into RWA.
Clicking on to Microsoft Office 365, we get three links. Not to mention a very slick looking transition.
As you would imagine, clicking Outlook Web App, takes us to Outlook Web App. You will have to sign in, if you are not already.
Clicking on Office 365 Home, takes us to our Office 365 Home/Dashboard.
Clicking on Quick Start, takes us to an online help page.
Email Settings
Of course once you have signed up, you want to get your email right? Obviously you will be using a mobile device as well, so you will want to know what your server settings will be.
It is actually quite easy to find, i cant publish a generic setting as it will be different for each organisation.
Login to OWA. Find Options on the right hand side, and go to See All Options.
Look for the link ‘Settings for POP, IMAP and SMTP Access..’
A window will popup and show you your settings.
The server name, in the above example ‘pod51017.outlook.com is the setting you will need, that differs for each organisation.
When you come to setup your mobile device, or email client, that is the setting you will need.
Above shows the settings entered into my iPhone for Office 365. Notice my username is the full login name for Office 365, and i do not have a domain specified.
If you have Outlook 2007 or 2010 running on your computer already, you can easily configure it to connect to Office 365.
You just need to go to add an account, and enter your email address and password. Autodiscover will take care of the rest.
I did go through the download process of the Office 365 ‘Configure Desktop applications…’ But i didn’t find this added anything that the integration into the Launchpad didn’t already provide. It still resulted in me having to manually add my email account to Outlook so i think it is unnecessary to use this in an SBS Essentials network.
Having said that, if you are not using the Launchpad, as a lot of people seem not to be, then this might be useful.
Moving on we will look at a small issue i found once i had sent some test emails.
Email Display Name
After i had setup my phone to sync email with Office 365, and sent a test email, i noticed something odd.
You can see my display name was set to RobertPearman, not how i would want it to look when emailing a client.
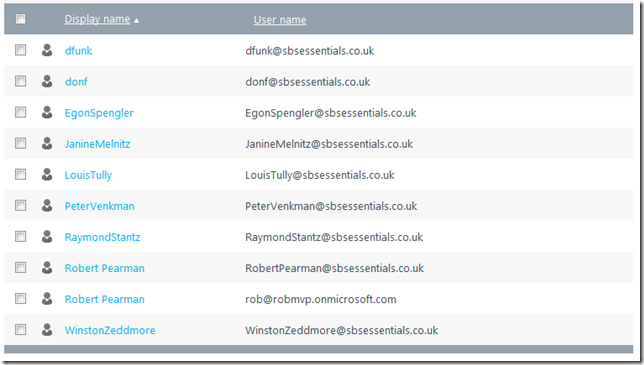
I noticed in the Office 365 dashboard all the users Sync’d from SBS Essentials were set this way.
This appears to be a one way sync, in that it is setup initially then changes on the Essentials Server are not replicated.
So to change this you need to login as the Office 365 administrator, and click on one of the two Admin links.
Then go to Users.
Click on the user you want to modify.(you have to do this individually)
Go to the Details tab.
Change the Display Name field to be set the way you want, and then scroll down to click on Save.
You should find the change is updated more or less immediately
Office Applications
A little outside of the Integration with SBS Essentials, but to answer an obvious question – You only get to install copies of the applications with an E3 Plan.
If you have a P Plan then you are entitled only to use web based applications.
With the E3 Plan you receive an offline copy of Office Professional Plus to install on your computer, as well as having access to the online applications.
Related Links
SBS Blog – Office 365 Module RTM
SBS Essentials Now on Dell Servers!
Message From Rob…
Hi Thanks for reading my post. I hope it was useful to you. As we are approaching Christmas and the season of goodwill and all that kind of thing, id like to take a small amount of your time and ask you to take a look at my Room to Read page.
I don’t make any money out of running this blog site, and i never intended to, but if any of the posts i have written have helped you out, and if you could spare even a small amount of cash to help this amazing charity i would be, in the words of Douglas Reynholm.. beholden to you.
Thanks
Merry Christmas, and a happy new year to you!
Rob.













hi rob,
is is really gr8 document. is this work with SBS 2011 standard edition as well?
thanks,
Snehal
There is no direct integration with SBS 2011 Standard.
Nothing stopping you using the service though.
Awesome post! I will keep an on eye on your blog.
Very, very detailed, thanks so much. The problem is that I can’t get that beta thing on my server to begin with. What am i supposed to do? Use terminal services to remote into the server and then download it and install it from bared naked SBS? i would have thought that SBS would have made this easier some how.
Essentially yeah, just download it and install it. It doesn’t need to be ‘naked’ SBS, you can install it at any time.
Hey Robert,
great post, haven’t read it completely (i will i promise :)), but about changing the domain, you aren’t actually required to switch over DNS control to Office365, you can just manually add the required entries in your ‘old’ dns-manager. Granted, if stuff changes within Office365 you will need to manually update, but there’s no need to relinqiush complete DNS control to Office365.
Hi Philipp,
Yeah you should read the whole thing, you will probably enjoy my escapades with the DNS.
Rob.
Thanks for the post. I will be installing a new SBS 2011 soon and this is very helpful. Glad to see that the Office 365 Integration is now public.
It’s a shame you don’t have a donate button! I’d definitely donate to this excellent blog! I suppose for now i’ll settle for book-marking and adding your RSS feed to my Google account. I look forward to new updates and will talk about this website with my Facebook group. Chat soon!
=============================
As it happens i do!
http://titlerequired.com/donate
Enjoy!
You demonstrated changing the password in the server dashboard and having that sync with Office 365, which works for me as well. Have you tried changing a user password in the remote access page? I haven’t been able to get that one to sync with Office 365.
I am not sure i tried that, i will do today and see what happens.
Thanks for the reply! I actually got that to work recently, I had to reinstall the Office 365 Integration. Additionally I have verified that changing the password on the local workstation also syncs with Office 365. However, if I change the user’s password in Office 365 it DOES NOT sync back to AD. Does yours work the same way?
From memory yes i think that is expected behaviour.
This is a great resource, thanks.
We are already running Office 365 (migrated from BPOS) and an on-premises WHS2011.
However, I’ve been dragging my feet around integration for one simple reason: passwords.
My question: will this give me single sign-on capability, i.e, logging on my local AD will log me onto Office 365? What will be that new unique password: the one I already have for local machines, the one from Office 365, ou a new one for both?
Also, can I now, after the integration, enforce that password will never expire…? Or should I still change them every 3 months? Further password management can now be done from the WHS2011 console, or will I still need to login onto Office 365 admin?
Thanks in advance,
António
As far as i am aware the integration module is only supported on SBS Essentials, not on Home Server.
It does not provide single sign on.
Passwords set on the Essentials box sync to Office 365, but it is a one way sync.
If I understand this correctly the Office 365 Integration for SBS Essentials 2011 shown here does NOT provide SSO (single sign on). So how do I add SSO to SBS Essentials 2011 and Office 365?
To Enable SSO, you would need to deploy ADFS – however in my opinion this is a real waste of resources, and still does not provide good fail over.
I don’t think it is a huge task for people to sign in to Office 365 once they are logged into their computer.