May 10, 2011
by Robert Pearman
Now that we have worked out our syntax for our powershell scripts, we need to add them to some scheduled tasks to run them out of normal business hours – or just to automate them so you don’t have to do it manually.
In Part 1 we covered which commands we are going to run if you missed that, you can find it here.
You will need to have these commands saved as powershell scripts, (.ps1 files) you can do that by simply putting the syntax into notepad and saving the file with the .ps1 extension.
The 3 scripts are:
$Export = get-mailbox; $Export|%{$_|New-MailboxExportRequest -FilePath \\localhost\PST\$($_.alias).pst} |select-object filepath, sourcedatabase, mailbox, status | format-list| out-file c:\users\admin\mailbox-export-log.log
get-mailboxexportrequest | select-object filepath, sourcedatabase, mailbox, status | fl | out-file c:\users\admin\mailbox-export-result-log.log
get-mailboxrequest -status completed | remove-mailboxrequest -confirm:$all
get-mailboxexportrequest -status completed | remove-mailboxexportrequest -confirm:$all
To add them to a scheduled task is slightly different than running your average batch file, it even has a little more complexity than running a normal powershell script, because for exchange cmdlets to run, you have to load the exchange powershell snapin as part of your scheduled task.
You can find a lot of useful info out on the net, some of the most useful posts i found are linked at the end of this article.
Firstly you will want to add a new scheduled task, if you go to Start > All Programs > Accessories > System Tools > Task Scheduler
On the top right, you can click ‘Create Task’

You will need to enter a name for the task, i would also suggest enter in some details here to document what the task does. You will also need to click, ‘Run Whether user is logged on or not’ and ‘Run with Highest Privileges’

Switch to the ‘Triggers’ tab, and click on New. Here you can define the schedule that the task will run to, i would suggest you gauge the length of time the task takes to run, so you know how much time you need to run the task to minimise any disruption or performance issues.

Click on OK. You can see your trigger defined. Now click on the ‘Actions’ tab and click ‘New’.

In the program/script field enter the following:
PowerShell.exe -command ". ‘c:\Program Files\Microsoft\Exchange Server\V14\bin\RemoteExchange.ps1’; Connect-ExchangeServer -auto; & C:\users\dfunk\documents\scripts\export-all-mailboxes.ps1"
This breaks down to the following (based on my interpretation)
PowerShell.exe (runs powershell)
-command ". ‘c:\Program Files\Microsoft\Exchange Server\V14\bin\RemoteExchange.ps1’;
(launches the exchange shell component)
Connect-ExchangeServer -auto; (connects to the exchange server)
& C:\users\dfunk\documents\scripts\export-all-mailboxes.ps1" (executes our script)

Click on OK to save this syntax.

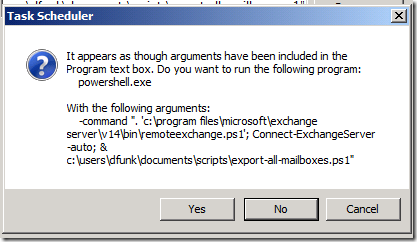
You are prompted because the task scheduler detects arguments to run with your command, click yes here.
Click on New again, to add a second action, which is to send an email.
Choose ‘Send an e-mail’ from the dropdown menu.
Fill out the details that are relevant to your environment.

Click on OK, and then click on OK again to save your task.
You will be prompted for your password as we are allowing this task to run if a user is logged on or not.

Enter your password and click ok, and you be returned to the task scheduler. You will see your new task added.
Right click the task, and choose ‘Run’ to test your task.
If you click on your task, and go to the History tab, you will see the status of your task as it runs…

You can see both actions have completed.
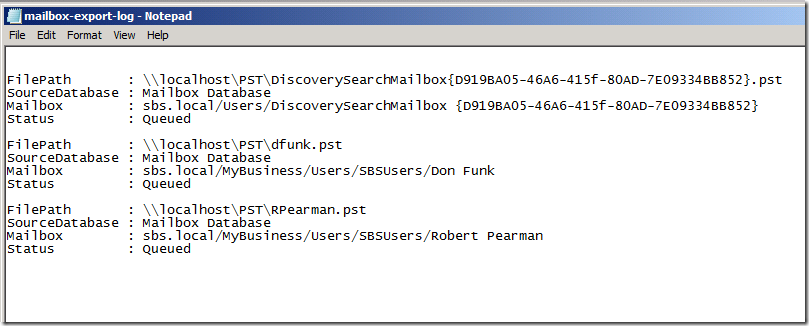
Now, let’s check we have a log file created..

And we should also have an email…

Not a particularly inspiring email it has to be said, but it does tell us that our task has kicked off.
Now, we can add a second scheduled task to run our second powershell script. This script will be almost identical but we will be running our powershell script to check on the status of the exports.
With this task you can also add an attachment to the email action, which is the output log file of the powershell script.
get-mailboxexportrequest | select-object filepath, sourcedatabase, mailbox, status | fl | out-file c:\users\admin\mailbox-export-result-log.log
This command will output the status of the exports to the c:\users\admin\mailbox-export-result-log.log.
Depending on the length of time it takes for the script to execute you may need to separate the ’email log action’ into a third task, so you actually capture the log file after the export results are complete. Otherwise the log file may show that the mailboxes are either ‘queued’ or ‘in progress’

Your email should look something like this..

Now, the final task to add, is our final script.
get-mailboxrequest -status completed | remove-mailboxrequest -confirm:$all
get-mailboxexportrequest -status completed | remove-mailboxexportrequest -confirm:$all
This should be run as the final script, after your results email has arrived to clear the logs for the next time the tasks are run.
I used the following links to pull this info together as well as the built-in powershell help.
http://technet.microsoft.com/en-us/library/bb123798.aspx
http://www.mikepfeiffer.net/2010/02/creating-scheduled-tasks-for-exchange-2010-powershell-scripts/
http://computerperformance.co.uk/powershell/powershell_format_list.htm
http://blogs.technet.com/b/sbs/archive/2011/05/09/how-to-import-and-export-mailboxes-using-pst-files-in-sbs-2011-standard.aspx
Updated 10/2/2012 Fixed Syntax for Export Request
 Those of you following me on Twitter will no doubt have seen or ignored more than a few tweets from me recently about how much i like PowerShell.


