Quick Fix: Outlook 2010 Sending from a second Exchange Mailbox

sbsstd

I have been battling this problem for some time now. It has been driving me to distraction it is fair to say.

Exchange

What i didn’t realise until now, is that i was actually battling two separate issues, once i realised that it made the solution clear.

The issue i was facing was that additional mailboxes were being automatically added to an Outlook profile. This was puzzling me because firstly, i didn’t know why it was happening, and secondly i OutlookLogowasn’t able to send from that second mailbox. I could manually type in the address in the From field, but i wanted to be able to choose it and have the signature change based on the account i was using.

So a lot, of research, lab work and questions later i think i found the answers, and the solution.

Issue 1. Exchange 2010 SP1 Full Mailbox Access

Are you running Exchange 2010 SP1 with clients running Outlook 2010 SP1?

If you are, and like me you have shared mailboxes, or generic mailboxes that other users access, you may be used to setting Full Mailbox access permission on those generic accounts.

Full Access

(You would then add them to Outlook through the properties of your Primary Mailbox, under More Settings, and Advanced)

With Exchange 2010 SP1 and Outlook 2010 SP1 having given full mailbox access to an account, you may have seen a that the account that you have full mailbox access to, has automatically added itself to your Outlook profile.

You may also notice, there is no way to remove it!

auto added

This behaviour is actually well documented, but one of the best explanations i found is here.

If you don’t want to bother reading that – and you should read it – basically using Exchange 2010 SP1 EMC, EMS to add Full Mailbox Access, now also sets an Attribute on the account – msExchDelegateListLink. This attribute says which other accounts have access to this mailbox.

Attribute

Outlook 2010 SP1 will look for that key now and anyone that matches, will be auto added. Quite straight forward when you know what is happening.

So that is the first part of the mystery solved.

The solution to stop this happening is easy, remove that attribute. You can either do it through ADSIEdit, or by Adding Full Mailbox Access with a script instead of using the EMC/EMS. again ill point you back to this blog for the solution.

Assuming you have now removed that attribute, you can go ahead and add the second mailbox the traditional way.


Issue 2. Outlook 2010 Send from Multiple Exchange Mailboxes

But wait – once you have done this, you still cannot select it as an account to send from?

send

At this point i really started to get frustrated. I was wrongly blaming Exchange 2010 SP1 for this weird behaviour and missing the clue right under my nose.

It seems that the ability to send from a second Exchange mailbox, when it is added in what i will call, the traditional manner, has been changed in Outlook 2010.

I’m running Outlook 2010 and have several exchange mailboxes open, i just had never noticed this behaviour. I’m also running Exchange 2007, and having been dealing with the issue outlined above, i never thought to look at my own Outlook.

The solution here seems to be very simple indeed.

Once you have removed the attribute, you still retain full access. That means you can add the second mailbox, as a totally separate account, and you wont be prompted to login to that mailbox, because your current credentials have permission to open it.

So to recap, first you need to make sure you remove the msExchDelegateListLink attribute from the second mailbox. Then just add that second mailbox as a second account. You will need to close Outlook down in order to do that, when adding the mailbox choose to ‘Manually Configure Server Settings..’

manually add

You will then see the mailbox as a second account.

second account

And you can choose to send from this account as well.

send from

I really hope this helps you, and saves you some time and energy!

Quick Fix : SBS 2011 Standard (Exchange 2010) 554 5.1.0 Sender Denied

sbsstdHad a puzzler last week. Client called up to say one of his contacts couldn’t email him. It was being rejected.

Message Rejections will be a common problem for many people, and the best thing to do is get a copy of the rejection message or what i call NDR (Non Delivery Receipt (or Report) )

Luckily in this case, there was actually an NDR generated, because some times email can just seem to vanish into the ether, and you’re left with little to go on…

Also luckily for me the third party was happy to send on the NDR via my client’s secretary.

The smart ones reading will now have figured out that the rejections were only to my caller – the third party was able to email the secretary successfully.

Here is the NDR

NDR Message

You can see that the Error Code is #5.1.0 smtp; 554 5.1.0 Sender denied

Sender denied i thought… sounds like something was configured in Exchange… which it turns out it was, but not what i thought.

Also, the NDR in question was generated by their Exchange server, not by their Offsite AntiSpam service, which helped me quickly identify that the issue was at their Exchange, not at the Anti Spam service.

Sender Filtering, is one of the Anti Spam tools enabled and running by default on SBS 2011 Standard.

Usually the NDR above would be associated with an address that is blocked by the Sender Filter running on the Hub Transport Role.

However in this case there were no addresses blocked by the Sender Filter at the server level.

(if you want to look at the Anti Spam tools, i have covered their location at the end of the post)

In this case the address was defined by the users own Junk Mail settings.

I logged into the SBS RWA (Remote Web App) and logged into Outlook Web App (OWA)

SBS RWA

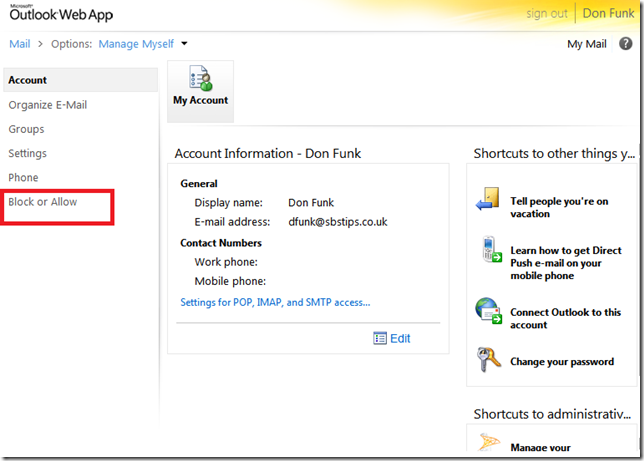
Clicking on to Options, then More Options, there is a ‘Block or Allow’ option in the menu on the left hand side.

Outlook Web App

Outlook Web App Options

OWA Options

If you click here you can see a list of Allowed Senders, and a list of Blocked Senders.  Scroll Down to see Blocked Senders.

OWA Block or Allow

OWA Blocked Senders

Sure enough the email address being rejected was set to be blocked. Removing the address from this list will allow emails to be received from that address. Make sure to save the changes and that should solve the problem.

Remove Blocked Sender

It wont solve the mystery of how the address ended up as a blocked sender, but that mystery will live on, like the other great mysteries we face, such as using a PC during a power cut, Photocopying a floppy disk to use as a backup, and using the optical drive as a beverage cup holder.

Exchange Anti Spam Tools

You can find the Anti Spam tools on SBS by opening up Exchange Management Console, Navigating to..

Organization Configuration, Hub Transport, Anti Spam Tab

2

And Under …

Server Configuration, Hub Transport, You will find another Anti Spam Tab..

3

Exchange 2010 Anti Spam Related Links

MS TechNet – Enable Anti-Spam on a Hub Transport Server

MS TechNet Managing Anti-Spam Features

SBS 2011 Standard Additional Accepted Email Domains (Multiple Accepted Domains)

My customer is expanding his business, and is going to add a specialist arm of his company in a particular field.

As such he has setup a new website for that particular department and wants some of his staff to have a new email address based on whether they work for that part of the company.

This is really very easy to setup using Email Address Policies, and i will show you how to do that in this blog post.

I did try to get the process a little more automated, and integration into the add user wizard would have been great, but so far i haven’t got that working, but i am hoping with a little prodding of the SBS Dev team, we may be able to find a way.

To follow me through this process, you will need:

A Server running SBS 2011 Standard.

Two domains configured to send email to the SBS Server.

Some user accounts to test with..

First of all what we will do is add our new domain name as an accepted domain in Exchange.

The process for this is very similar, if not identical to that of Exchange 2007.

From Start, go to All Programs, Expand Microsoft Exchange server 2010 and open up the Exchange Management Console (EMC).

1

When the exchange console opens, expand Microsoft Exchange On-Premises, expand Organization Configuration and select Hub Transport.

2

Switch to the ‘Accepted Domains’ tab.

3

This shows you the current accepted domains.

36

On the right hand side, select ‘New Accepted Domains’

4

Enter a name for your new domain, and enter the domain name itself. We will leave the server as the authoratative server for this domain, click New,

5

After a few seconds, the action will complete, and you will be shown the PowerShell command that would have performed this action from the exchange shell. Click Finish.

6

You can now see your additional domain added as an accepted domain.

7

If we now switch to recipient configuration, and the mailbox section, we can see our current mailbox users.

8

If we go to the properties of one of these accounts, we can see the current email addresses associated with that account.

9

We can see that no changes have been made to this account so far.

That’s good because it means existing users are not affected by what we have done.

We will have a look at existing users in a moment, but first let’s add a new user to the system.

Since i am listening to The Beatles at the moment, i am going to call this guy John Lennon. My Favourite Beatle happens to be George, but that isn’t relevant. Why then am i not calling him George Harrison, well i don’t know.

I am not covering the add user wizard here as other posts exist out there on how to do this. Plus it is in the books relating to SBS 2011.

So John, is a good guy and he’s working for my company’s new department.

But wait, as we can see here, he still has an SBSTIPS.co.uk address, not TITLEREQUIRED.com – that is good, that is what is expected.

10

Now, we need to edit his account.

Let’s open up ADUC (Active Directory Users & Computers) From Start, go to Administrative Tools, and you will see ADUC at the top.

Expand Yourdomain.local and keep expanding down until you find MyBusiness\Users\SBSUsers

11

Find John’s account, and go to the properties.

Switch to the ‘Organization’ tab, and enter ‘Titlerequired’ into the department field.

13

Click OK to save this change, and close ADUC.

Switch back to the EMC

Go back to the Organization Configuration, Hub Transport area, and go to the ‘Email Address Policies’ tab.

14

You can see we have 2 current policies. The Windows SBS Email Address Policy is set to make whatever domain name you entered in the Internet Address wizard the default for all users.

So we want to add a new Email Address Policy. On the right click, New Email Address Policy.

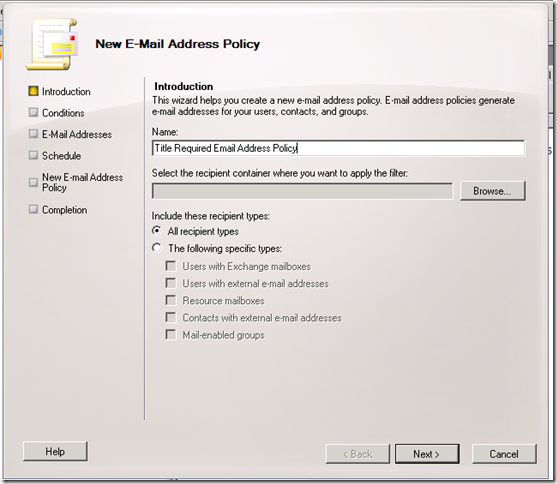
We need to enter a name, and also select the container where this policy should be applied, and also the type.

You can leave these as default values, but please do enter a name. Click Next.

15

Put a check in the box for ‘Recipient is in a Department’ under Step 1.

16

Under Step 2, select the hyperlinked word ‘specified’ and enter our department name value of Titlerequired.

17

You can then click Preview, and the policy will show you which users or recipient types it will affect. Hopefully we will only see Mr. Lennon’s name.

18

We do! That is great because it means whatever we are doing here will only affect that one account.

When you are happy click next.

On the email addresses page, click Add.

19

Here we choose how the new email address should look, i like to use first initial and surname, so i will select that.

The default is to add a new email address to the ‘default’ domain, since this is yourdomain.local the new address for John would be jlennon@sbs.local – we want to add this to our new accepted domain, so we must choose to specify the accepted domain.

Click the radio button for that option, and click Browse.

You will then see all the domains we have setup on our system.

20

Double Click the domain you want to use, and it will be added to your policy.

21

Click Ok.

You will now see your email address shown, using the variables that are used for whatever name format of address you chose. More on that here.

22

The table below is taken from the TechNet website and shows variables you can use.

23

Click Next.

You have the option to apply the new policy immediately, or at a scheduled time, or not to apply it all. We want to do it immediately, so click next.

24

You will see a summary page with some PowerShell commands listed. Click New to build and apply the policy.

25

The policy is built and applied successfully.

26

Lets switch back to our Recipient area, and check the email addresses our users now have.

We can see that our user still has his old address.

27

Switching back to the Policies area, we can see our new policy has a priority of 2, and the Windows SBS policy is set at 1.

28

We need to change it to priority 1. Select your new policy and on the right hand side, click Change Priority, and enter the number 1, Click OK to save.

29

It now jumps to the top of the list.

30

Now we need to reapply the policy. Right click the policy and click Apply. We get those same options as before, click on Next, and Apply.

31

24

Again you are shown some PowerShell, and you can click Finish to close the Apple Policy page.

Switching back to Recipient Configuration, you can now see that John has a new email address. (you may need to refresh the view)

32

IF we go into his account properties you can see he now has an email address for both SBSTIPS.co.uk and TITLEREQUIRED.com but that TITLEREQUIRED.com is his default address.

33

If we want to move an existing user to a new department, just edit their AD account to change their Department, and then reapply the policy.

34

You can see that the email address is added as an additional address.

35

And that is how to add an additional domain name and have it apply to only certain users.

If you want to have an additional domain apply to all users, but not as the default, then simply don’t narrow your Email Address Policy by using a department as in Step 1 and 2 above, and leave the policy at priority 2.

You can always use the Preview button to help confirm who will be affected by such a change.

If you want to change the default domain for all users, you should run the Internet Address Wizard and add your new domain here, then add your old domain as an accepted domain, and build a policy as described here to add that old domain as an additional address.