WSUS 2012 R2 and Windows 10 1703
August 1, 2017 Leave a comment
 I have been working on WSUS and Windows 10 for the last few days, following some rather annoying updates to newly deployed Surface Pro devices, and more importantly a grumbling comment from a co-worker ‘can’t we automate this stuff anymore?’.
Well i have to say that was the final straw. Windows 10 and WSUS has been a pain for me since it was released.
With hotfixes, tweaks and dances required and failing to get Windows 10 talking and working with WSUS consistently it perhaps was no surprise that i had opted to point 10 directly to Windows update and only control the schedule and ring, rather than the more traditional granular approach taken with Windows 7 and 8.
So, Yes, the answer is we should be able to manage patching with Windows 10.
Yes, we are going to manage it.
The client that we had just deployed the Surfaces to, already had WSUS running to patch around 150 Windows 7 Desktops and Laptops. In addition they now have about 30 Windows 10 devices.
I also have a WSUS Server i point client servers to which i decided to point some Windows 10 lab machines at.
Neither of which were working to support Windows 10.
Now, as an aside, the clients WSUS Server was broken.
I didn’t know that until i started working on this issue, but what had happened was… quite a convoluted turn of events i wont bore you with.
Suffice to say it had recently been reinstalled. Rules and groups configured to manage updates and left to let clients populate and patch.
When logging in to it to begin working on Windows 10, i noticed that not many clients had actually reported status. So i figured i should fix that before carrying on.
Clients not reporting is again another issue that plagues WSUS administrators the world over with various fixes and tweaks.
In this case, WSUS had clearly not installed correctly because a folder was missing from the server.
This folder contains a CAB file that any client downloads when registering to the server.
The fix for that was easy, and required creating and populating that folder.

The folder in question can be found here, C:\Program Files\Update Services\SelfUpdate\WSUS3 inside here are 3 folders one for each architecture. Make sure inside x86 and x64 you have a Win7SP1 folder.
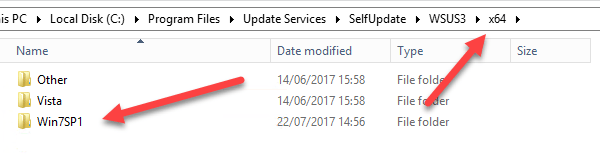
If you find it is missing you can grab it from the WinSXS folder, look for a folder named amd64_updateservices-selfupdate-x64-win7sp1{guid} inside here are the CAB files you will need.


Just replacing that folder was enough to get the remaining Windows 7 clients talking to WSUS, however.. because of the number of updates each client has to process and a maximum of the amount they can process per detection you may encounter an issue in the log, WARNING: SyncServerUpdatesInternal failed: 0x80244010, the key thing to do here is increase your detection frequency on the clients to once per hour.
The reason for that is, it is not a permanent failure, the error just means it reached the max number of updates it can process this time around. At the next poll interval it will continue.
It may then error 3 or 4 more times or as many times as it takes until it has processed the whole list of updates.
You want this process to complete as fast as possible, so, lowering the frequency from say 22 hours, to 1, means it might complete in 4 hours, instead of 4 days. This is nicely explained in a blog post from back in 2008!
If your WSUS is already in working order, your Windows 10 machines should be registering, but, will likely show no status for all updates. This again is related to processing time, but, simply lowering the frequency is not enough due to the differences in how the Windows Update Client now works.

First thing we need to do is make sure your server is patched to support Windows 10.
You will need KB3095113 and KB3159706.
KB3159706 includes manual steps to complete, which are:
- Run Post Install Servicing on WSUS,
- Add HTTP Activation to .NET4
- Check the configuration of the Web.Config file for the Client Web Service.
Install both the patches and reboot your server. Open an Elevated CMD and enter:
"C:\Program Files\Update Services\Tools\wsusutil.exe" postinstall /servicing
Next, open an elevated PowerShell Window and enter:
Add-WindowsFeature –Name NET-WCF-HTTP-Activation45
Now, open the Web.Config file from C:\Program Files\Update Services\WebServices\ClientWebService (you may need to take ownership)
takeown /f web.config /a icacls "C:\Program Files\Update Services\WebServices\ClientWebService\Web.config" /grant administrators:f
You may find these changes are already present, if not enter those highlighted, and save the file.


That completes the installation of KB3159706.
We need to make some adjustments to IIS which we can do with PowerShell.
The following will update, the Wsus App Pool (WsusPool) memory usage and CPU settings, the ClientWebService httpRuntime settings and adds a new MIME Type. You can either paste it into an elevated PowerShell window, or save it as a ps1 file.
Import-Module WebAdministration

Write-Output "Configure WSUS AppPool CPU & Memory Settings"

$path = "iis:\AppPools\WsusPool"

$cpuSpan = New-TimeSpan -Minutes 15

$pmSpan = New-TimeSpan -Minutes 5

$fSpan = New-TimeSpan -Minutes 15

$cpu = Get-ItemProperty $path CPU

$processModel = Get-ItemProperty $path ProcessModel

$cpu.resetInterval = $cpuSpan

Set-ItemProperty $path CPU $cpu

$processModel.StartupTimeLimit = $pmSpan

Set-ItemProperty $path ProcessModel $processModel

$failure = Get-ItemProperty $path Failure

$failure.loadBalancerCapabilities = "TCPLevel"

$failure.rapidFailProtectionInterval = $fSpan

Set-ItemProperty $path Failure $failure

$rMemory = get-itemproperty $path recycling

$rMemory.periodicrestart.privateMemory = 18342456

Set-ItemProperty $path recycling $rMemory

Write-Output "AppPool Configuration Completed"

Write-Output "Configure ClientWebService Settings"

$eSpan = New-TimeSpan -Hours 2

set-webconfigurationproperty system.web/httpRunTime "iis:\sites\WSUS Administration\ClientWebService" -name maxRequestLength -Value 204800

set-webconfigurationproperty system.web/httpRunTime "iis:\sites\WSUS Administration\ClientWebService" -name executionTimeout -Value $eSpan

Write-Output "ClientWebService Settings Configured"

Write-Output "Add MIME Type"

$mimeName = "application/octet-stream"

$mimeExt = ".esd"

Add-WebConfigurationProperty //staticContent -Name Collection -Value @{fileExtension=$mimeExt; mimeType=$mimeName}

Write-Output"MIME Type Added"
This should be enough to get your Windows 10 machines talking to WSUS, however there are some circumstances where this won’t be.
If you had already synced updates to WSUS for Windows 10, prior to the Hotfix 3095113 being released, this may apply to you.
The issue is described here in a blog post which focuses on Windows 10 1511, additionally another KB article which is for 1607 describes an issue where you had synced updates prior to KB3159706 being installed.
We have to purge these updates out of the WSUS Database, which requires declining them deleting them and removing them from the DB using SQL Commands, once the hotfixes have been installed we can then download the updates again.
If you are not if this step applies, you should make sure you have a full, tested backup of the server and then run through the procedure. It doesn’t take a huge amount of time and you can be sure then you are in a known good position.
To run the SQL commands, you can load up SQL Management, connect to the WID by entering the following:
ServerName : \\.\pipe\MICROSOFT##WID\tsql\query

In the SQL Management Studio you can expand the SUSDB and start a new query.


Paste your commands, and click Execute.

So you have configured your WSUS, got your Windows 10 machines showing up and reporting status.
You have approved some updates and…. nothing happens.
Client Side Checks
On the client side of course Windows 10 has changed how the WindowsUpdate.log is generated, it requires the use of a PowerShell cmdlet (Get-WindowsUpdateLog) to be run, which then collates all the Windows Update events and generates a log of your desktop.
In addition to that, you will find a file in c:\windows\SoftwareDistribution called ReportingEvents.log which shows a basic outline of what the Windows Update client is doing.
It seems that even though you have set the Detection Frequency to hourly, the client computer is not going to report its status hourly.
Indeed, it may not be until after a reboot of the client before it reports it status. There are commands you can run to try to manipulate the Windows Update Client, however i have not seen any command that magically made a client device refresh status to WSUS before it was ready. This includes /resetauthorization and /detectnow switches for the WUAUCLT.exe tool. Also if a client has pending updates already queued up from talking directly to Windows Update, it will need to finish those before it even registers on WSUS.
Defer Upgrades
On my Surface i had manually set to Defer Upgrades. As part of writing this post i set my Surface to talk to WSUS through the Local Group Policy, I didn’t change the Defer Upgrades setting in the GPO, so my choice in the GUI was still applied.
Even though my Surface is running 1607 and i was expecting WSUS to show 1703 was needed, because i had set Defer Upgrades it wasn’t showing up as a needed update in WSUS.
It took me to remove the Defer Upgrades setting, before WSUS showed 1703 as needed regardless of whether it was approved or not.
Here are two Windows 10 clients on my lab WSUS Server.
Windows 10 – 1703 Upgrade Approved

This client shows that 1703 has failed, but when clicking on the status it shows the update has been downloaded. When manually going into Windows Update on the client, the updates show as available to install.

All the updates installed successfully, except the 1703 Upgrade which failed with error 0x800FFFFF.

It seems that the same issue described in KB3159706, also applied to 1703 on my server. So, i tweaked the steps in that article and performed them again.
$s = Get-WsusServer

$1703Updates = $s.SearchUpdates(“version 1703”)

$1703Updates | foreach { $_.Decline() }

$1703Updates | foreach { $s.DeleteUpdate($_.Id.UpdateId) }
Then in SQL Management,
 declare @NotNeededFiles table (FileDigest binary(20) UNIQUE);

insert into @NotNeededFiles(FileDigest) (select FileDigest from tbFile where FileName like '%15063%.esd' except select FileDigest from tbFileForRevision);

delete from tbFileOnServer where FileDigest in (select FileDigest from @NotNeededFiles);

delete from tbFile where FileDigest in (select FileDigest from @NotNeededFiles)
Then back in PowerShell.
Get-WsusClassification | Where-Object -FilterScript {$_.Classification.Title -Eq “Upgrades”} | Set-WsusClassification


$sub = $s.GetSubscription() $sub.StartSynchronization()
I had to re-approve the 1703 Upgrade, before the client detected it as an available update, but after that it downloaded successfully and installed.


On my lab machine, which is a pretty low spec VM it took almost two hours to complete the update.
It took another 15 minutes before it had updated its status to WSUS, which then showed 100% installed.

After logging into the client and checking Windows Update, i was shown this message stating my device was at risk.

I checked for updates from Microsoft and it started to download several updates that were not yet available on my WSUS Server.

I was able to use the WU Catalog to import them into WSUS.

I expect following the purge of updates for 1703 they had been removed and that they would have automatically been downloaded to WSUS again at the next synchronisation.
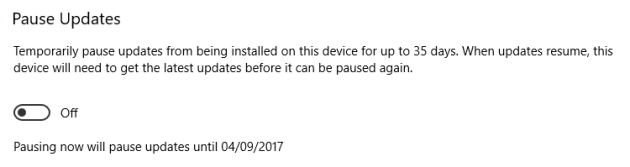
Note: Defer Upgrades seems to have been removed from the GUI In 1703, replaced with ‘Pause Upgrades’.
Windows 10 – 1703 Not Approved

This client reports to WSUS as needed only the 1703 Upgrade, which is not approved.

The client shows no available updates when checking manually.
If you are still experiencing issues on the clients, you may need to reset the Windows Update Client components, and the easiest way to do that is using the Windows Update Troubleshooter, which you can download from here.
